Combination square
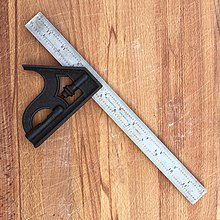
 A Starrett combination square with a standard head | |
| Other names |
|
|---|---|
| Classification |
|
| Inventor | Laroy S. Starrett (1877) |
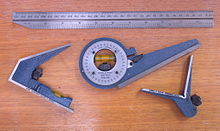
A combination square is a multi-purpose measuring and marking tool used in metalworking, woodworking, and stonemasonry. It is composed of a rule and one or more interchangeable heads that can be attached to the rule.[1][2] Other names for the tool include adjustable square, combo square, and sliding square.
The most common head is the standard head, which is used as a square for marking and testing 90° and 45° angles.[3] The other common types of head are the protractor head, and the centre finder head.[4]
Description
[edit]

Rule
[edit]Combination square rules are made of steel and can be purchased with gradations in metric, imperial, or both metric and imperial. Both faces of the rule have markings, providing four different sets of markings. This allows different sides to have different graduations (eg. 1mm or 0.5mm markings) or units (ie. metric and imperial). The rule typically comes in lengths between 150mm and 600mm or between 4 inches and 24 inches.[1][2]
Heads
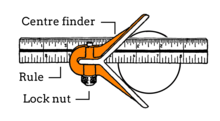
[edit]The heads, occasionally called anvils, are attached to the rule by sliding the rule into a slot in the side of the head. The head is then tightened in place via a lock bolt or lock nut which engages with a channel running the full length of the rule, allowing the head to be tightened on at any point along the rule.[4][2]
The standard or square head has three adjacent flat faces, two of them meet square to one another, and the third face is angled away at 45°. When attached one face is parallel to the rule, one face is perpendicular, and one face is at 45°. The standard head usually incorporates a small spirit level and a small removable scriber.[4]
The protractor head has a flat reference edge which is attached to an adjustable 180° protractor or (sometimes called a turret) with a graduated scale in both directions for reading both the angle or the complement angle.[1] The protractor head sometimes includes a small spirit level.[4][2]
The centre finder head has two faces meeting at 90°, when attached one edge of the rule bisects the two faces at 45°.
The heads are manufactured from either forged steel, cast iron, die-cast aluminium, die-cast zinc, or plastic. Aluminium and zinc heads are cheaper than steel and iron, but less durable and more prone to inaccuracy.[5] Cast iron and steel heads are also notably heavier. The heads are usually painted except for the flat machined reference faces.[citation needed]
Uses
[edit]As well as being used as a regular standalone rule or straightedge, the rule is used in combination with the different heads.
Standard head
[edit]
The standard head can be used as a:
- Square, for marking and referencing 90° angles and checking if surfaces are flat and square to one another.
- Mitre square, for marking and referencing 45° angles, such as in woodworking for mitre joints.
- Spirit level, to check if a surface is level or similarly if a surface or edge is plumb (vertical).
- Depth gauge or height gauge.
- Form of marking gauge for marking lines parallel to an edge, by setting the head to a certain distance from the end of the rule.[6]
- Reference for directly transferring dimensions without needing to take a measurement, minimising measurement errors and inaccuracies.[7]
Protractor head
[edit]
The protractor head can be used for:
- Measuring and checking angles between surfaces, edges, and markings.
- Marking angles from an edge
- Directly transferring angles, like a bevel gauge (sliding T gauge), to minimise measurement errors and inaccuracies.
- Measuring and marking angles relative to the horizontal by using the spirit level.[2]
Centre finder head
[edit]
The centre finder head can be used for:
- Marking lines through the centre of circular or square objects, such as dowels. Making multiple marks at different angles can be used to identify the point at the centre of the circle.
- Marking lines perpendicular to a curved edge (normal lines).
- Bisecting square corners to mark a 45° angle.[2]
History
[edit]Though some earlier 19th century tools were called combination squares, the modern combination square was invented in the late 1870s by American inventor Laroy S. Starrett, and patented in 1879.[note 1][8] In 1880 he founded the L. S. Starrett Company in Athol, Massachusetts, United States. The tool was originally designed for machinists, but over time became commonly used in other trades, such as woodworking.[7]
Notes
[edit]- ^ Sources differ on the exact year he invented the tool, but the US patent was filed and granted in 1879.
References
[edit]- ^ a b c Dotson, Connie (2015). Fundamentals of Dimensional Metrology. Cengage Learning. pp. 100–106. ISBN 978-1305177741.
- ^ a b c d e f Raghavendra, N. V. (2013). Engineering metrology and measurements. Krishnamurthy, L. New Delhi: Oxford University Press. pp. 89–91. ISBN 978-1-68015-280-7. OCLC 900729269.
- ^ Campbell, Paul D. Q. (1995). An Introduction to Measuration and Calibration. Industrial Press Inc. ISBN 978-0-8311-3060-2.
- ^ a b c d Livesey, Andrew; Robinson, A. (11 February 2013). The Repair of Vehicle Bodies (6th ed.). Routledge. p. 93. ISBN 978-1-135-12049-8.
- ^ Rae, Andy (March 2015). "The Multitalented Combination Square: A whole lot of tool in one small package". Woodcraft Magazine. pp. 50–54. ISSN 1553-2461.
- ^ Capotosto, Rosario (September 1988). "Combination Square Know-How". Popular Mechanics. p. 130. ISSN 0032-4558. Retrieved 25 October 2020.
- ^ a b "Combination Squares". Popular Woodworking Magazine. 25 April 2020. Retrieved 24 October 2020.
- ^ "US Patent: 215,024 - Try Square". Directory of American Tool and Machinery Patents. Retrieved 24 October 2020.
